Pages

Monday, June 20, 2011

T-shirt Rescue

Ever notice how boys are so hard on their clothes? My guys beat up their clothes much more than my daughter! Guess that's part of their rough-n-tumble nature. But by time the hand-me-downs make it to boy #3, they often have stains or holes. With a little creativity, those clothes can be rescued!

Here are two shirts in pretty good shape. Both had dime-sized stains, as well as a tiny hole on the blue one. My little guy's recent fascination with narwhal whales provided the needed inspiration. I cut out a basic narwhal from wool felt (they're basically a chicken-leg shape with a horn), fused it to the shirt over the offending stain and hole, then "drew" in the lines with my sewing machine along the edges. I did some quick embroidery for a mouth and eye - voila!


Big brother had a navy t-shirt with holes everywhere - beyond saving! But there was a good sized piece that I used to cut out the letter Z. Basic running stitches of varying size outline the letter. The raw edges of the knit won't unravel, but will get a distressed, curled edge. I think this shirt looks kind of like a superhero shirt, don't you? Perfect for a little guy with super speed and energy!

I love rescuing and recycling clothes. It's like a second lease on life! I've used Dad's t-shirts to make shorts for the kids, perfect for pjs or underneath skirts. Before you toss out those clothes, look around on the internet - there are tons of tutorials and ideas on how to revamp them into something unique and useful. What have you done to save or repurpose nearly-perfect clothes?

Rain, Rain - c'mon let's play!!

A new adventure for me: sewing laminated cotton! It's waterproof, so trying it out on a rain hat was perfect! I found 1/2 yard of this Amy Butler print on sale (which happens to match my rain coat and umbrella) and an easy pattern for free. Good deal!
The pattern is a free download: Simplicity Bucket Hat pdf. It's just the pattern pieces; I couldn't find directions on the Simplicity site (looks like an old pattern!), but it's pretty straight forward. There's an outer fabric and a lining. The pattern also calls for interfacing, but since the laminated cotton was pretty stiff, I skipped that. Both hats are lined in navy cotton, but I had enough polka dot flannel to do the brim lining for one hat. It only takes about 1/2 yard of fabric, and somehow I managed to cut TWO hats' worth of pattern pieces out of that....hmmm. Don't cut patterns late at night. :)
These are both the adult large size, but you can see it fits a kiddo pretty well. I would make the brim wider for an adult hat if I made it again. This was a surprisingly fast project. I spent more time pinning and clipping seams than actually sewing!

Wednesday, June 15, 2011

Creative Burst

Oh my, the bug has bitten me! We're gearing up to start school again in a few weeks, so I'm trying to finish up a bunch of projects so I'm not distracted.

Noro Cash Island & Noro Kureyon scarf, improvised the pattern and love it. Half way finished!

Daughter said "I have no shirts to wear!" and so I went into action. Gingham, pintucks, and vintage buttons! The lace is reclaimed from one of great-grandma H's handkerchiefs. I kind of improvised this pattern too...it's not as short as it looks, the camera lens did some strange things here. The neckband needs to be finished and I'd like to adjust the sleeve bands a bit to allow more ease. This reminds me of 4th of July picnics for some reason.

The England Swings charm square bag is DONE! I used a solid yellow for the lining and added some purse rings to the straps. Also added a button and loop closure.

Here are two pockets on the inside using leftover charm squares.

Our deck is done! This was a big project (which we did not do ourselves). I had a lot of fun dreaming up an outdoor space suitable for entertaining larger crowds. Our builder did a great job of catching the vision and making it reality! Now to dress it up - flowers are starting to go in around the front...
...purple coneflowers and an orange tiger lily, and no summer is complete without red geraniums.

I finished the binding on my Christmas quilt today! This was supposed to be finished for Christmas 2010, but it got a bit delayed. :) This used a honey bun of Glace by Three Sisters, plus additional yardage for the red border (same for backing). The rest is Kona cotton in khaki. I cut my teeth on straight line quilting with my new walking foot on this one. I'm waiting to see what it looks like after a run through the wash....

Whew! That's a bit this week! It feels so good to finish projects, but then again I love to start projects! I just cut out the pieces to make a rain hat for myself with some laminated cotton. Can't wait to see how that sews up! When that's done, then my creativity will be turned fully onto the school plans. Perhaps I can sneak a little sewing in during breaks. :)

Thursday, June 9, 2011

Charmed, I'm sure

I've been working on my Jewel Charm Square purse from the Mad Quilter tutorial this week. It's nearly finished, but before you see the final product I thought I'd share an in-progress shot. These England Swings fabrics are so cheerful - I love their colors! I paired them with a sunny yellow fabric for the purse lining. A few design tweaks to the original pattern are in the works....you know I couldn't just do anything as written! Check back soon to see how it finally turns out!

Saturday, June 4, 2011

Mystery and Study Hall

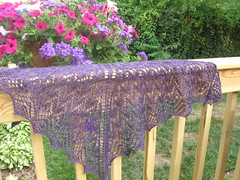
Hot off my needles:
WendyKnits summer mystery shawl KAL

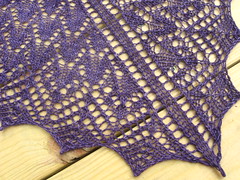
WendyKnits summer mystery shawl KAL

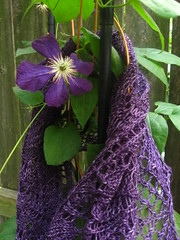
WendyKnits summer mystery shawl KAL

Summer Mystery Shawl knit-a-long by WendyKnits
yarn: Malabrigo Sock, color Africana Violeta, used about 70% of 1 skein
needles: US 7

A mystery knit-a-long is when the directions (or "Clues") are released bit by bit over a designated time frame. The knitter doesn't know what the final project will look like... an exciting way to knit something, for sure!

Also from under the needle:
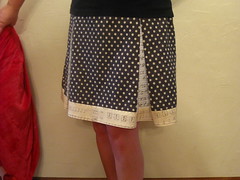
Study Hall skirt
Study Hall skirt

This is the Study Hall Skirt by Anna Maria Horner. I had this school-themed fabric kicking around for a while, and thought it'd be a good marriage with a school-inspired pattern! This reminds me a lot of my days spent in a cheerleading skirt, only this is quite a bit longer (ahem). As for the pattern, I cannot give it 5 stars, even though I'm very happy with the end product. I made the size XL, and was very upset to find one of the bottom band pattern piece did NOT fit on the fabric yardage as stated on the back of the envelope. So I had to put seams that particular pattern piece, which required some figuring so that they would fall somewhat hidden within the pleats. It may have fit if I did not wash/dry my fabrics first, but the directions told me to wash/dry, so wash/dry I did. The method of constructing this skirt seemed a bit convoluted to me as well. After sewing the backside by the book, I abandoned the directions in favor of common sense and experience when piecing the front. I also installed the invisible zipper (center back) a different way than directed. I was also put out that the directions reminded one to buy extra fabric for one-way designs, but then neglected to offer cutting layouts for one-way designs. Since I cut this out late at night in a rush, I forgot to do this and ended up with some upside down handwriting in two of the inverted pleats. I didn't have any fabric to spare, so I had to let it ride. All that said, I would not recommend this pattern to a newbie seamstress, but someone familiar with clothing construction should be able to figure it out with no problems. There were lots of great diagrams to help along the way.